
R237.75
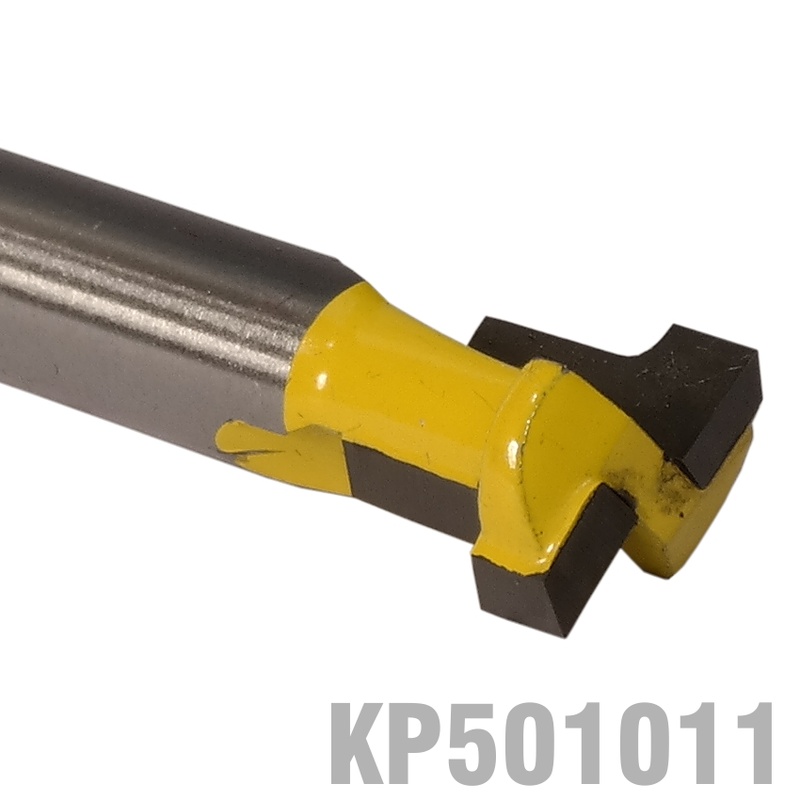
 Keyhole cutter 9.58mm wide
 This bit is so different from the usual 'edge treatment' bits that it deserves highlighting.
It is a highly specialised bit that is used for one purpose only, to cut keyhole slots in picture frames or any object you would like to hang flat against a wall. If you have ever owned one of these bits, you know that it saves a lot of money and a lot of frustration.
Keyhole slots can be put in most picture frames. For a heavy frame, use two slots and two hanging screws. The process is quick and reliable, and saves endless wire and hooks, which you never have anyway when you need them.
These bits are single fluted for easier plunging. When you want to hang a shelf, picture frame, clock, or candle sconce on a wall but don't want the mounting screws to show, use an inexpensive keyhole router bit to cut screw slots instead. Then, when you hang the piece, it will appear to 'float' on the wall. And, with keyhole slots you don't need special hardware. Once you've got the tools set up, you can cut multiple slots quickly and easily.
This router bit has a 6.35 mm shank (shaft) that will fit most small routers. Please ensure that you select a router bit with a shank (shaft) size that will fit into your router collet.
PRO-TECH router bits are manufactured in Taiwan.

| consider safety for your health and the people around you | |||
General safety suggestions:It is advisable to always have the following items nearby and in a good condition
|
|||
 |
 |
 |
 |
|
Wear Gloves
|
Eye Protection
|
Hearing Protection
|
Dust Mask
|
To use router bits safely (and to get the best results from your router), the router bits need to be installed properly into the router's collet. Improper installation of your bits can cause excessive chatter and could increase the likelihood that the bits will break when in use.
First of all, before beginning any routing operation, check your bits to make sure that they are clean, relatively free of pitch, and most of all, sharp. If the bit is dull, chipped, is excessively burned or has any other defect, it should be sharpened or replaced before use.
 Correct
collet and collet nut fit
Correct
collet and collet nut fitMost router collets have a recess (groove) that needs to click into a circlip that resides inside the collet nut. Failing to ensure that the collet 'clicked' into the collet nut will cause you to struggle to remove the router bit after tightening. This could cause the collet to break or be removed by a technical repair centre.
 Correct
fit inside the collet
Correct
fit inside the colletWhen installing the bit into the collet, do not tighten the collet with the bit 'seated.' Instead, insert the bit until the shank (bit shaft) reaches the bottom of the collet, then ease it out about 2 mm before tightening the collet.
When the bit is tightened, there should be no less than 2/3 's of the length of the shank in the collet. If your bit has a shank that is too short, then the bit should be replaced.
There are a few other safety measures to keep in mind whenever you use your router. First of all, remember to always wear appropriate safety gear as indicated above.
Second, be sure to set your router to the proper speed for your router bit. Setting your router to an incorrect speed will not only affect the router's performance, but also can cause the bit to break much more easily and even cause bodily harm. The speed at which a router bit turns can be important. The typical router runs at about 22,000 rpm, which is fine for most bits. But as the diameter of the bit increases, you’ll want to slow things down.
Also, before beginning any routing operation, be certain that you give the router's motor time to come up to full speed for the chosen setting. Beginning to cut before the bit is at full speed can give less than desired results.
 Observe
the following at all times
Observe
the following at all times Always
be sure the router is unplugged before replacing bits and that the switch is
off before connecting the router.
Always
be sure the router is unplugged before replacing bits and that the switch is
off before connecting the router. Keep
hands and fingers away from revolving bits and cutters.
Keep
hands and fingers away from revolving bits and cutters.  Don't
operate a tool if you are tired or under the influence of medication, drugs,
alcohol or while smoking.
Don't
operate a tool if you are tired or under the influence of medication, drugs,
alcohol or while smoking.
A simple template for cutting perfect keyholes |
 |
| The first step would be is to use a guide bush that has a centre hole that is slightly larger than 10 mm as in the case with Pro-Tech router bit Model: KP501011. Attach the guide bush into the base of your router. |
 |
The second step is to make a template. A scrap piece of plywood or similar material is perfect for the job.

|
|
Step 3 shows how the guide bush and the template will fit onto the workpiece. The router is not shown for clarity. |
 |
|
Step 4 is not a difficult as it may seem. Just think carefully before start cutting the slot. The depth setup of the router bit through the guide bush is important. The slot part of the keyhole cutter should protrude enough to allow for the thickness of the template. (Try first on a scrap piece of wood). Remember the workpiece should hang, thus the large hole of the keyhole should be at the bottom. Once you are satisfied with the final depth of cut of the router and the depth gauge on the router is set, mount the router with guide bush into the template starting at the bottom of the desire keyhole slot you want to cut.
|
 |