
R3,780.90
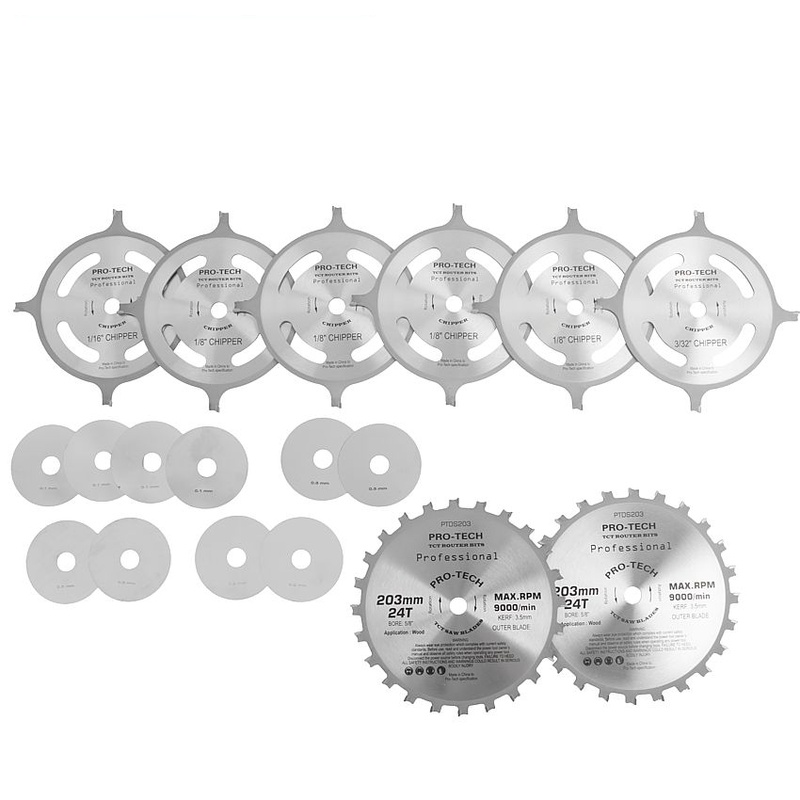
Pro-Tech's dado blade set fits as perfect in any wood workers workshop as what is expected of any perfect wood joint. Precise flat bottom grooves, dado's, rabbets are just what you can expect when using the Pro-Tech 203mm (8”) dado set. The complete set consists of two outer 24T carbide blades, four 3.2mm (1/8”) chipper blades, 2.4mm (3/32”) & 1.6mm (1/16”) chipper with a ten-piece shim set ranging from 0.1mm - 0.5mm allowing for width adjustment between 6.4mm (1/4”) - 25.4mm (1”). Precision grinded carbide teeth and anti-kickback design on the outer blades offers a perfect balance between precision and safety. Pro-Tech, tools for professionals.
Ensure the saw is switched off and unplugged when installing or removing the dado set from the machine.
The table saw's arbor must be clean and free of any material that could get caught between the arbour washer and the blade face.
Both sides of every blade, chipper, spacer, and shim must also be cleaned before they can be installed.
The two outer blades have bevelled teeth alternating with flat topped teeth. The bevelled teeth will form the shoulder of the dado, slicing cleanly across the grain of the wood. The flat-topped teeth will square out the bottom corners of the dado.
It is important that the bevels are running down towards the inside of the stack like in the photo below. If they are put on backwards, the corners of the dado will not be cut.
Depending on the width of the groove, rabbit or dado that needs to be cut, select the correct size chipper/s and shim/s. The total width of the outer blades, selected chipper/s, and shim/s, i.e., the total dado stack should be equal to the width of the groove, rabbit or dado that needs to be cut.
Start by installing the left outer blade against the arbor washer of the saw. If a shim is being used, this will go on next, followed by one of the chippers. The chipper's teeth should sit between two teeth of the outside blade and not be touching them. The teeth are wide enough that they overlap one another, so be sure there is no contact between any of the blades.
Add a 2nd shim (if necessary) and then another chipper, followed by another shim and chipper, depending on the total width of the cut required. Stagger the chippers so that they are an equal distance apart. This will help balance the dado stack and prevent any vibration from too much weight on one side.
Lastly, the right outer blade can go on. Try to line up the bevelled teeth side by side so that it is easier to get an accurate measurement with the calipers after the complete stack is added together.
Tighten the arbour nut finger tight at this point and rotate the dado stack by hand to verify that there is no contact between the teeth. Once everything looks good, tighten the dado stack firmly with the arbour wrenches.
Tips for using shims:
Once the dado blade is locked down, it is time to make a test cut in a scrap piece of wood, to see where you are at. Make sure you use push pads or a feather board and a push stick to run the stock through the blade.
The more you use your Pro-Tech dado set, and the more familiar you get with your table saw, the faster and more precise your work becomes.
This product does not have any reviews yet - be the first to write one.